 Need passport photos? Need a lot of passport photos? The going rate is between $5-10USD for a couple of 2″x2″ photos. For my recent trip, I needed around 20 of these pictures for visa and permit applications and I’m a cheapskate. Read on to see how you can make your passport photos for $0.12!
First, review the U.S. State Department’s guidelines on passport photography. So long as your photos meet these requirements, there is no need to use a professional photographer. Anyone with a digital camera, light-colored wall and Photoshop can produce these photos in no time. The primary requirements:
- Plain, light colored wall for background
- Light subject from both sides and background to avoid shadows
- Stand subject 4′ from wall
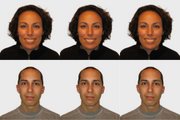
- Camera must be at eye level with subject facing and looking straight ahead without covering the face or making any expressions (mouth closed). No other persons or things can be visible in the photo.
- Zoom so the face covers about 50% of the photograph (or zoom/crop in Photoshop to make this happen)
- Resulting prints must be even toned, focused clearly and cut to exactly 2″ square (51mm)
That’s it! You can print a 4×6 photo for as little as 12 cents at places like Snapfish.com. I took mine to Walgreen’s where it cost a whopping $0.19. You can find similar pricing in most cities around the world where digital photo printing is very common. If you have a good color printer at home, you can do this effectively for free.
In practice, embassies seem flexible on these rules, particularly outside the United States. I recently had my passport stolen in Costa Rica and I used the same pictures as for my visas which didn’t quite meet these standards in printed size.
 You might be tempted to try putting 6 photos on a single 4×6 print. That was also my first effort. With more work, it may be possible but a 4×6 print isn’t usually 4×6 exactly because of bleeds and the sizes were a little too small. I wound up with putting just two photos on a 4×6 with plenty of white space to make cutting and trimming easy.
My girlfriend and I used these for traveling around the world in 13 countries for visas, immigration, scuba diving certifications and more. We kept a handful of them in our bags for whenever we needed them (which was a surprise 50% of the time). I also kept a copy of the image on a USB thumb drive so we could have more copies printed if needed.
Last tip – since printers vary, print a single copy and verify they are correct in size and color before printing up a fat stack for future use.
 All Categories from Feedburner
Comments are closed.